This post contains affiliate links. If you purchase through these links, I may earn a small commission at no extra cost to you.
Pi-hole + Unbound on Proxmox: Network-Wide Ad Blocking with Recursive DNS (2026)
Deploy Pi-hole v6 with Unbound recursive DNS in a Proxmox LXC container on a dedicated VLAN. Network-wide ad blocking with per-client visibility — no reliance on upstream DNS providers.

Most Pi-hole guides stop at "install it and point your DNS at it." That works, but you end up relying on Google or Cloudflare as your upstream resolver — which means a third party still sees every domain you look up.
Adding Unbound as a recursive DNS resolver cuts that dependency entirely. Your Pi-hole talks directly to the authoritative DNS servers for each domain, starting from the root servers. No middleman.
In this guide, we'll deploy Pi-hole v6 with Unbound inside a Proxmox LXC container on a dedicated VLAN. The setup gives you network-wide ad blocking across multiple VLANs with full per-client visibility in the Pi-hole dashboard — and zero reliance on upstream DNS providers.
I'm running Proxmox VE 9.1.6 on a Threadripper PRO 3995WX with a UDR 7 handling routing and VLANs. The Pi-hole container lives on VLAN 99 (a dedicated DNS network), and clients on VLANs 10, 20, and 30 send their DNS queries directly to it. VLAN 1 (WiFi guest network) is deliberately excluded.
Prerequisites
- Proxmox VE 9.x installed and accessible via web UI
- A managed switch or router with VLAN support — I'm using a UniFi Dream Router 7 (UDR7), but any router/switch that supports 802.1Q VLAN tagging works
- A VLAN for your DNS server — I use VLAN 99 (10.1.99.0/24). You can use any VLAN you have available, or skip VLANs entirely and put Pi-hole on your main network
- SSH access to your Proxmox host
If you haven't set up Proxmox yet, start with our Proxmox VE installation guide.
Step 1: Enable VLAN-Aware Bridging
Skip this step if your Pi-hole will be on the same VLAN/subnet as your Proxmox host, or if your bridge is already VLAN-aware.
By default, a Proxmox bridge (vmbr0) doesn't handle VLAN tags. LXC containers assigned to a different VLAN won't be able to communicate. We need to enable VLAN-aware bridging so the bridge can tag and untag 802.1Q frames.
In the Proxmox web UI, go to System → Network → vmbr0 and click Edit. Check the VLAN aware checkbox:
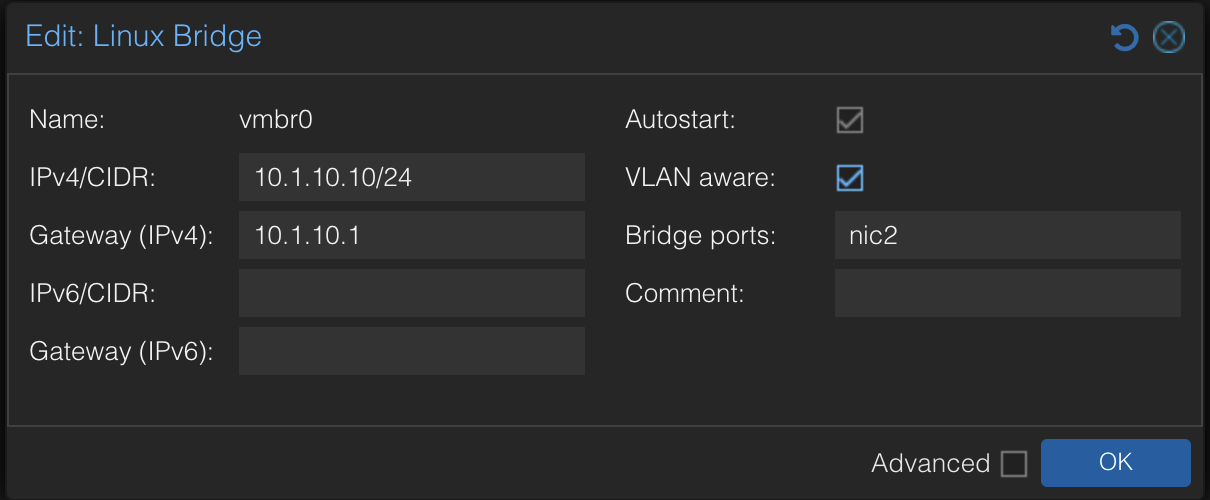
Click OK, then Apply Configuration. This adds two lines to /etc/network/interfaces:
bridge-vlan-aware yes
bridge-vids 2-4094
Your host's own traffic continues untagged — nothing changes for the Proxmox host itself. The bridge now accepts tagged frames from LXC containers and passes them to the upstream switch/router.
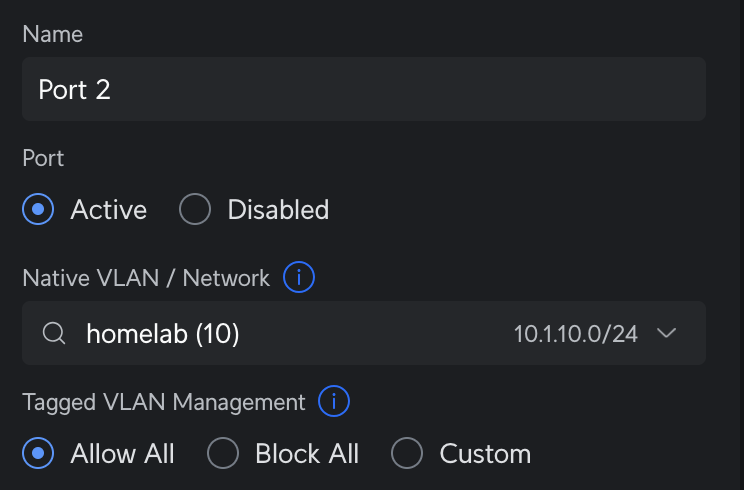
Verify the Router Port
If you're using a managed switch or router, make sure the port connected to your Proxmox host allows tagged VLAN traffic. On a UDR 7, check that Tagged VLAN Management is set to Allow All (or includes your Pi-hole VLAN):
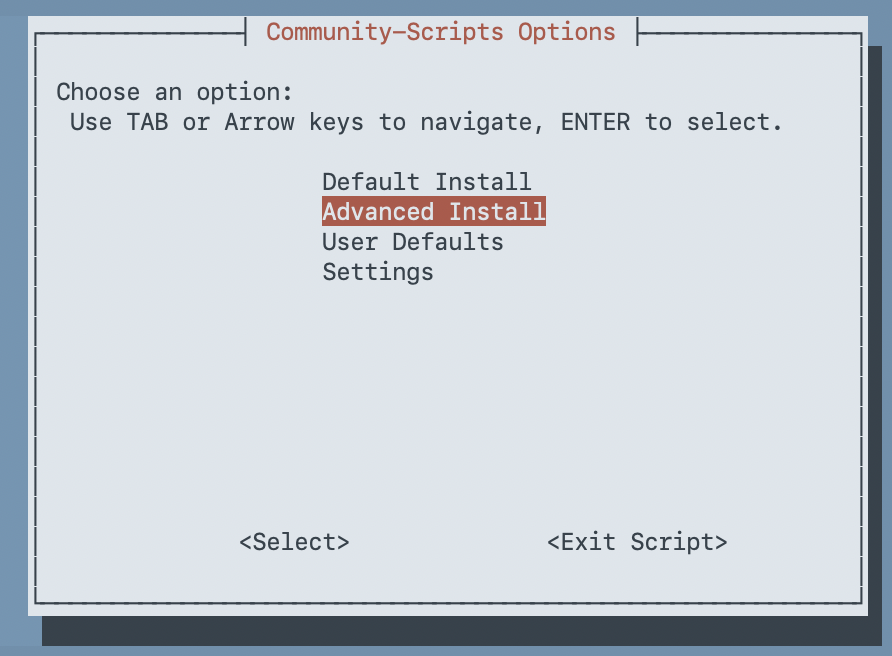
Step 2: Run the Pi-hole Helper Script
We'll use the community helper scripts to create the LXC container and install Pi-hole. These scripts are from the community-scripts/ProxmoxVE project — 5k+ stars, MIT licensed, actively maintained.
SSH into your Proxmox host and run:
bash -c "$(curl -fsSL https://raw.githubusercontent.com/community-scripts/ProxmoxVE/main/ct/pihole.sh)"The script opens a series of whiptail dialogs. Choose Advanced Install so you can customize the container settings:
Container Settings
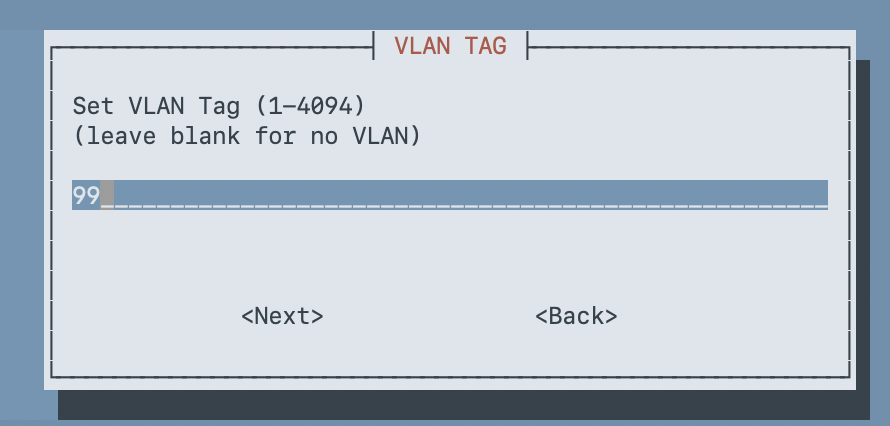
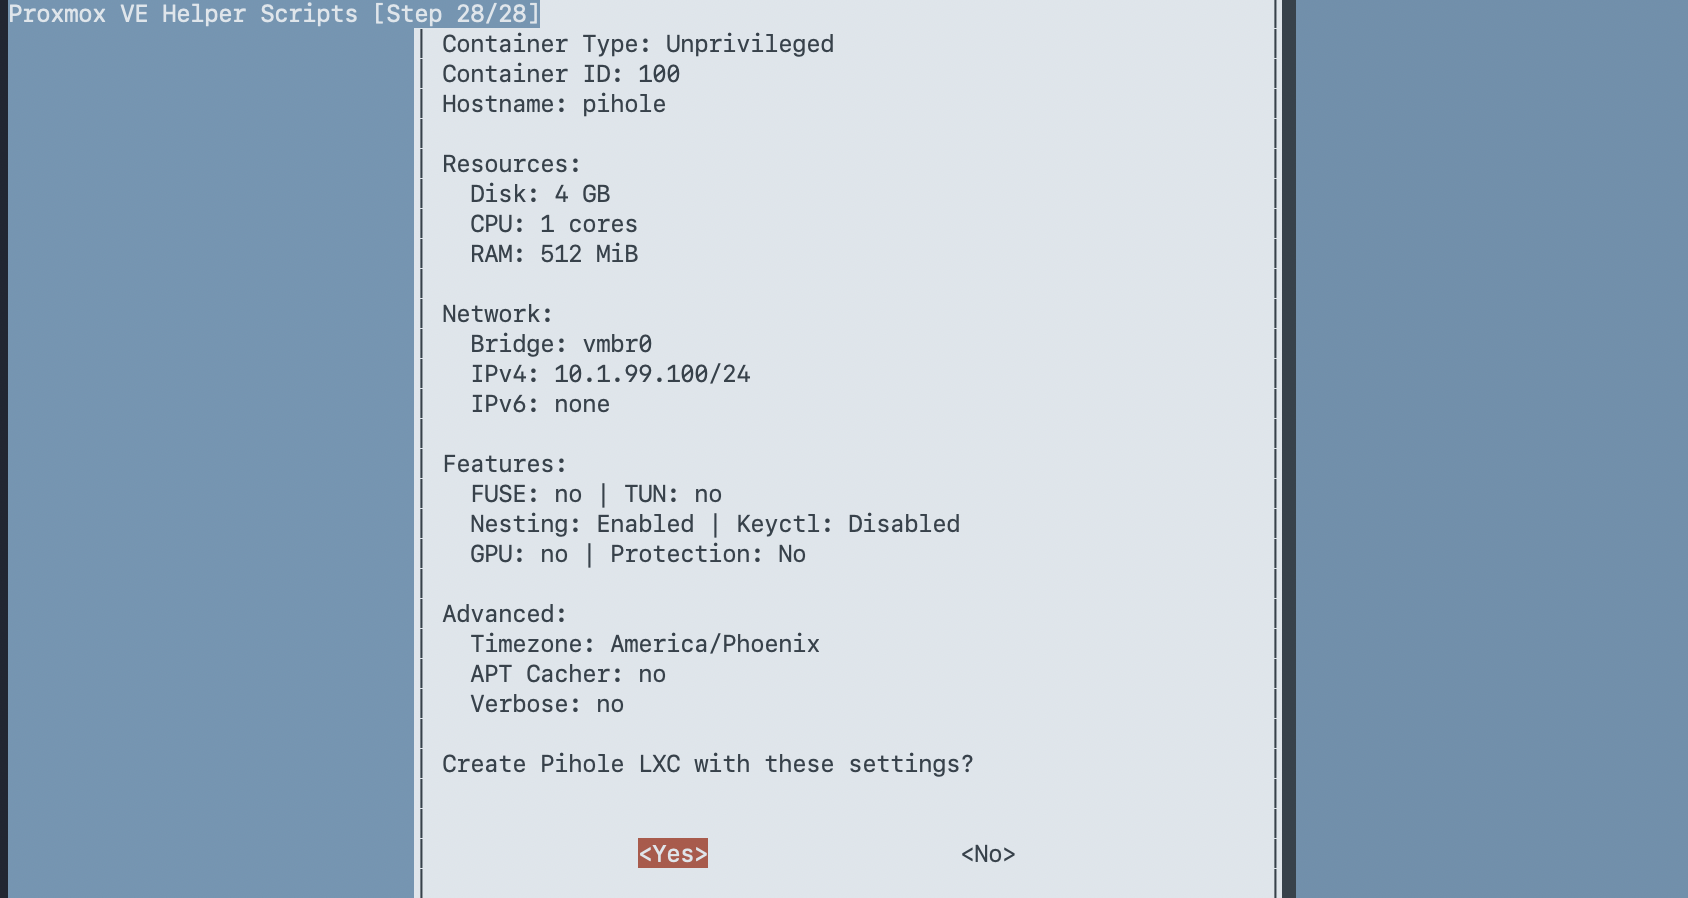
Here are the settings I used. Adjust the IP, VLAN, and resources to fit your network:
| Setting | Value | Notes |
|---|---|---|
| Container Type | Unprivileged | More secure — the default |
| Root Password | (set one) | For console access |
| Container ID | 100 | I use VMID = IP last octet |
| Hostname | pihole | |
| Disk Size | 4 GB | Default 2 GB is tight with logs + Unbound |
| CPU Cores | 1 | Pi-hole is lightweight |
| RAM | 512 MB | Enough for Pi-hole + Unbound |
| Bridge | vmbr0 | Your VLAN-aware bridge |
| IPv4 | Static | DNS needs a predictable address |
| IP Address | 10.1.99.100/24 | Your chosen IP in CIDR notation |
| Gateway | 10.1.99.1 | Your VLAN's gateway |
| VLAN Tag | 99 | Your DNS VLAN (leave blank if no VLAN) |
| DNS Server | (leave blank) | We'll fix this after install |
A few of the key dialogs:

Enable Nesting (Important for Debian 13)
When the script asks about Nesting Support, make sure it's set to Yes:
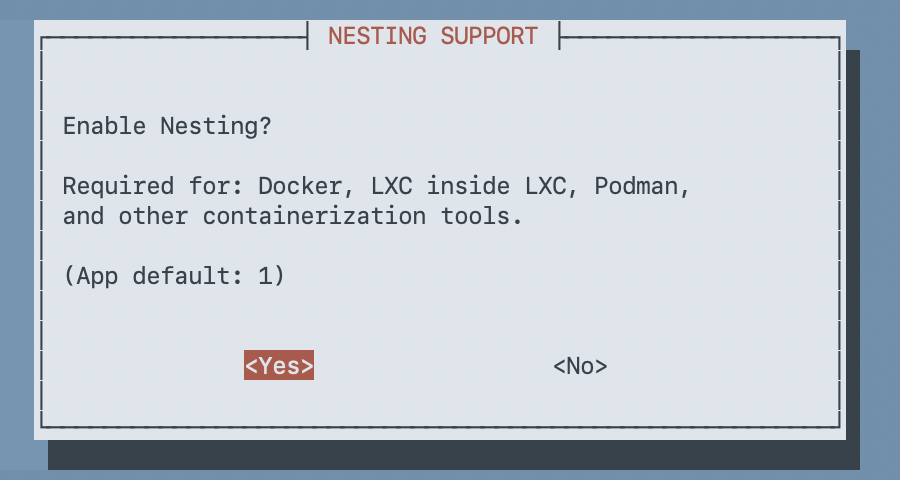
Warning: Debian 13 (trixie) ships systemd 256+, which requires nesting enabled on unprivileged LXC containers. Without it, the container starts in a degraded state — systemd can't create namespaces for service isolation, resulting in credential errors and failed services. The script defaults to Yes, but double-check it.
For the remaining prompts (FUSE, TUN/TAP, GPU passthrough, keyctl, APT cacher, container protection, device nodes, mount filesystems, verbose mode), accept the defaults — none of these are needed for Pi-hole.
Review the summary and confirm:
Step 3: Install Unbound
After the container is created, the script installs Pi-hole and then asks if you want to add Unbound:
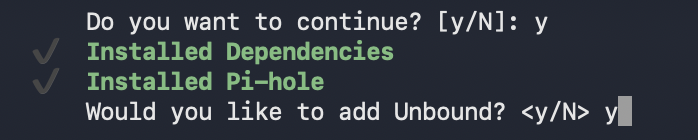
Type y to install Unbound. The next prompt asks whether to configure it as a DNS-over-TLS forwarder instead of recursive:

Type n (or press Enter) to keep the default recursive mode. This is the whole point — Unbound queries root servers directly instead of forwarding to a third-party DNS provider.
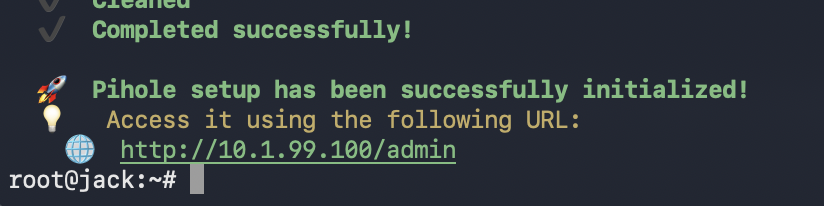
The script finishes and shows the Pi-hole admin URL:
Step 4: Fix the Configuration (Don't Skip This)
The helper script gets you 90% of the way there, but it leaves a few things misconfigured. I hit all three of these during my deployment — here's how to fix them.
Remove the Leftover Google DNS Upstream
Check the Pi-hole admin UI at http://<your-pihole-ip>/admin under Settings → DNS. You may see Google DNS (8.8.4.4) listed alongside Unbound:
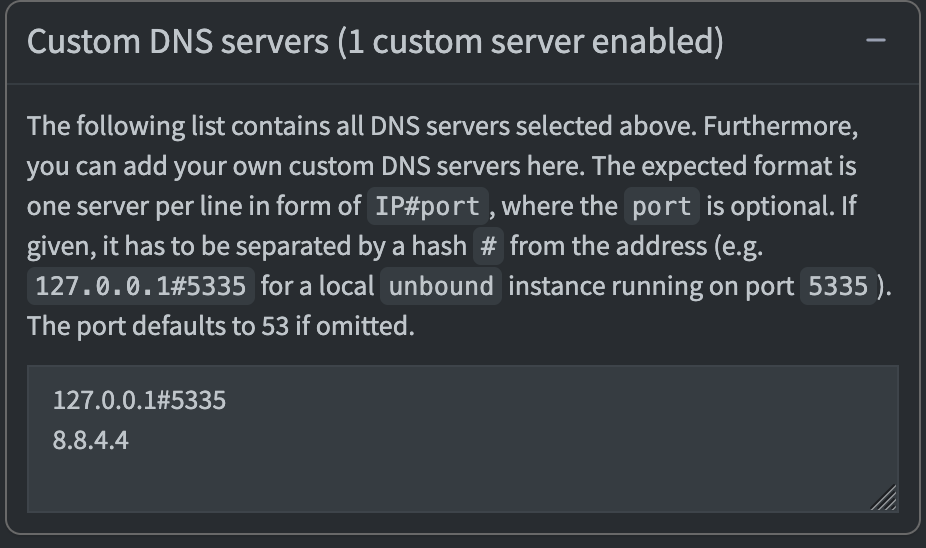
This is a known issue with the helper script. With Google DNS as a second upstream, some queries bypass Unbound entirely and go straight to Google — defeating the purpose of recursive DNS.
Fix it from the Proxmox host:
pct exec 100 -- pihole-FTL --config dns.upstreams '["127.0.0.1#5335"]'Verify it's gone:
pct exec 100 -- pihole-FTL --config dns.upstreamsExpected output:
[ "127.0.0.1#5335" ]
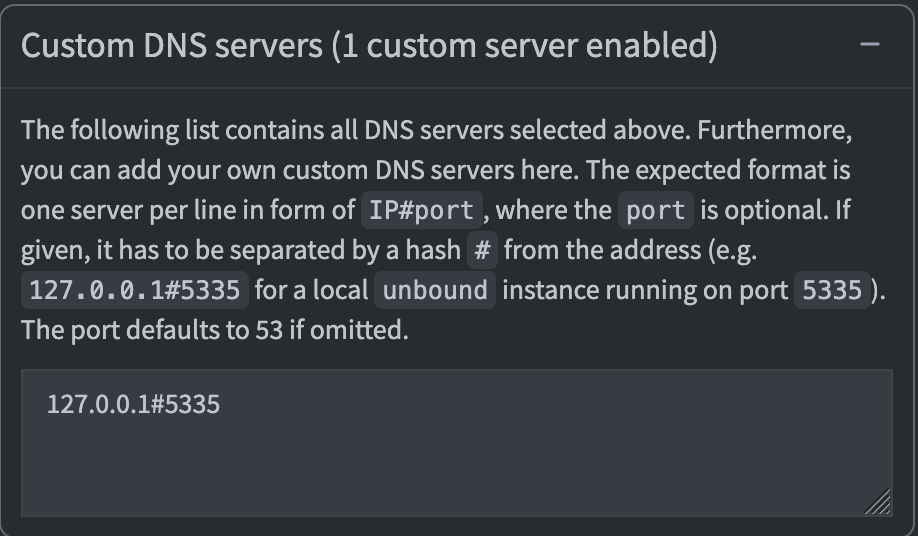
The admin UI should now show Unbound as the only upstream:
Change the Listening Mode
By default, Pi-hole listens in LOCAL mode — it only responds to queries from the same subnet (10.1.99.0/24). Since we're sending DNS queries from other VLANs (10.1.10.x, 10.1.20.x, etc.), Pi-hole rejects them as non-local.
Why not route DNS through the router? You could have all clients use their gateway as DNS and forward everything to Pi-hole from there. But that has two problems: (1) you lose per-client visibility — every query shows as coming from the router, not the actual device, and (2) you can't exclude specific VLANs since the forwarding is global. Direct client-to-Pi-hole gives you both per-client stats and per-VLAN control.
Change the listening mode to SINGLE (respond on eth0 regardless of source subnet):
pct exec 100 -- pihole-FTL --config dns.listeningMode singleThis is safe because Pi-hole only listens on eth0 inside the container — it's not an open resolver. Only traffic routed to VLAN 99 by your router can reach it.
Fix the Container's DNS
The script may have ignored the DNS server setting and inherited your Proxmox host's DNS instead. Check:
pct exec 100 -- cat /etc/resolv.confIf it shows your router's IP instead of 127.0.0.1, the container is resolving through the router rather than itself. Fix it:
pct set 100 -nameserver 127.0.0.1
pct reboot 100Note: LXC containers with static IPs don't use DHCP, so they never pick up DNS settings from your DHCP server. You have to set the nameserver explicitly in the Proxmox container config. Proxmox writes
/etc/resolv.confon container start based on this setting.
Step 5: Configure Per-VLAN DNS
Now point your network clients at Pi-hole. The approach depends on your router, but the concept is the same: set the DHCP-distributed DNS server to your Pi-hole IP on each VLAN you want filtered.
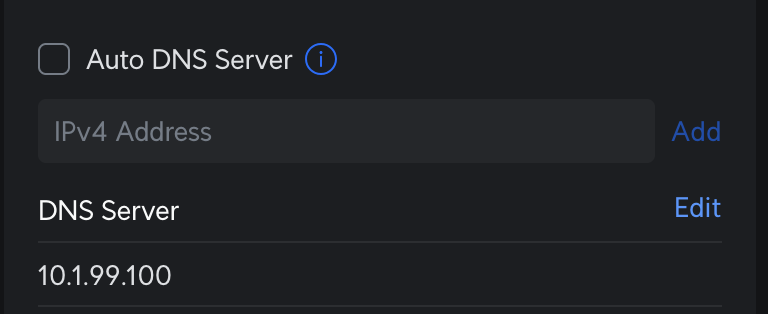
On a UniFi router, go to Settings → Networks, select each network, and set the DHCP Name Server to your Pi-hole IP:
Here's how I configured mine:
| VLAN | Network | DHCP DNS Server | Notes |
|---|---|---|---|
| 1 | WiFi | Auto (ISP default) | Excluded from Pi-hole |
| 10 | Production | 10.1.99.100 | Pi-hole + Unbound |
| 20 | Lab | 10.1.99.100 | Pi-hole + Unbound |
| 30 | IoT | 10.1.99.100 | Pi-hole + Unbound |
Do not change your router's global/WAN DNS setting to Pi-hole — that would force all VLANs through it, including any you want to exclude.
Don't Forget the Proxmox Host
Your Proxmox host also has DNS configured, and it's manual — not managed by DHCP. If you want the host itself filtered by Pi-hole, update /etc/resolv.conf on the host:
# On the Proxmox host (not inside the container)
echo "nameserver 10.1.99.100" > /etc/resolv.confStep 6: Verify Everything Works
Test Unbound (Recursive DNS)
From the Proxmox host, query Unbound directly inside the container:
pct exec 100 -- dig @127.0.0.1 -p 5335 google.com +shortYou should get an IP address back. If this times out, Unbound isn't resolving — check that the container has internet access and that Unbound is running (pct exec 100 -- systemctl status unbound).
Test Pi-hole
Query Pi-hole from the Proxmox host (cross-VLAN):
dig @10.1.99.100 google.com +shortThis should return an IP. If it times out, check the listening mode (should be single) and that your router is routing traffic between VLANs.
Test Ad Blocking
dig @10.1.99.100 ads.google.com +shortExpected: an empty response or 0.0.0.0 — the domain is blocked by Pi-hole's gravity list.
Check Pi-hole Stats
curl -s http://10.1.99.100/api/stats/summary | python3 -m json.toolYou should see queries_blocked, gravity_size (should be ~78,000+ with default lists), and other stats. Note: Pi-hole v6 uses /api/ — the old /admin/api.php endpoint no longer works.
Verify from a Client
On a device connected to one of your filtered VLANs, renew DHCP (or disconnect/reconnect WiFi) and run:
nslookup google.comThe server should show your Pi-hole IP (10.1.99.100). Check the Pi-hole admin dashboard — you should see the query logged with the client's actual IP address, not your router's.
Wrap-Up
Here's what we've built:
Client (any VLAN) → Router (routes to VLAN 99) → Pi-hole → Unbound → Root DNS Servers
Pi-hole handles ad blocking and query logging. Unbound handles recursive resolution — no queries leave your network to a third-party DNS provider. Each client's queries are logged individually (not hidden behind the router IP), and you have per-VLAN control over which networks use Pi-hole.
The whole thing runs in a single LXC container using 1 vCPU, 512 MB of RAM, and 4 GB of disk. It handles DNS for my entire network without breaking a sweat.
A few things to consider going forward:
- Add more blocklists — the default Pi-hole lists are a solid start, but OISD and Hagezi are worth adding for broader coverage
- Set up local DNS records — point hostnames like
jack.home.labat your homelab IPs through Pi-hole's Local DNS feature - Monitor the dashboard — the Pi-hole v6 admin UI is genuinely useful for understanding your network's DNS traffic patterns