
Complete Proxmox Backup Server Setup
November 5, 2025Tutorial
⚠This site is under active development. Some features may not work as expected, and new content is being added regularly.
This is Part 1 of the PBS 3-2-1 Backup Strategy series. Each part covers one tier of redundancy end-to-end — setup, backup, and a real disaster recovery drill. Part 1 (this guide) covers the local USB tier. Part 2 covers PBS-to-PBS pull sync for hardware fault tolerance. Part 3 covers Cloudflare R2 for offsite cloud backup.
In the PBS Setup Guide, we installed Proxmox Backup Server as a VM on the same host it's backing up. That protects against accidental deletion, bad upgrades, and corrupted configs. But if the physical drive dies, the backups die with it.
The 3-2-1 backup rule fixes this: 3 copies of your data, on 2 different media types, with 1 copy offsite. This series adds all three layers using PBS 4.0 and 4.1 features. Part 1 gets you the second media type — a USB drive with PBS's removable datastore feature, configured entirely in the web UI with no manual partitioning or fstab work.
By the end of this guide you'll have:
backups datastore to the USBThere are two ways to use a removable datastore. We'll set up the first one and show you what to change for the second.
Run on Mount and Unmount when done advanced options. Plug the drive in, sync triggers automatically, drive auto-unmounts when done, unplug and store offsite. More secure against ransomware (air-gapped when unplugged) but requires manual effort.NOTE
If you're running PBS on bare metal (not in a VM), skip Step 2 — the drive is already visible to PBS as soon as you plug it in. Everything else is identical.
Plug your USB drive into the Proxmox host (the physical machine, not the PBS VM). Confirm it's visible to the host:
lsblk -o NAME,SIZE,TYPE,MOUNTPOINT,MODEL
The USB drive should appear as a new disk with its model name and size. It should NOT be mounted. Make a note of the model name and size — you'll pick the drive from a dropdown in the PVE web UI in the next step, and you need to know which one is yours so you don't accidentally pass through the wrong USB device.
WARNING
The PBS Directory wizard in Step 4 will wipe the drive. Make sure you've identified the right device — confirm the size and model match your USB drive before proceeding.
NOTE
Skip this step if you're running PBS on bare metal — the drive is already visible to PBS.
Since PBS runs as a VM, you need to pass the USB drive through to it. Proxmox VE has built-in USB passthrough that's a few clicks in the web UI.
In the Proxmox VE web UI:
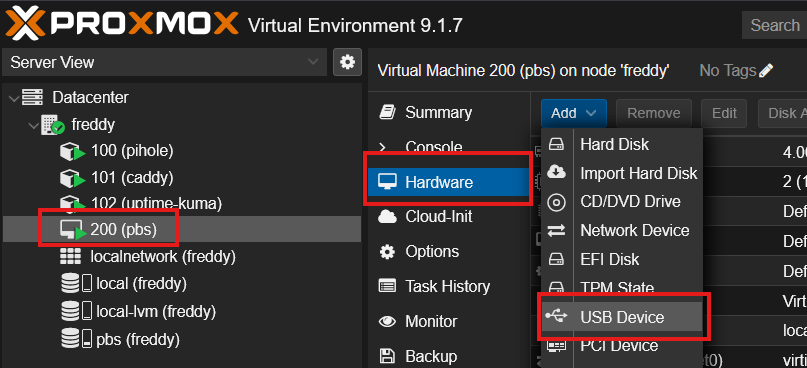
The USB device appears in the VM's hardware list immediately. PBS sees it as a new block device (typically /dev/sdb) without a reboot — go check by clicking the PBS VM > Console or by SSH'ing in and running lsblk.
WARNING
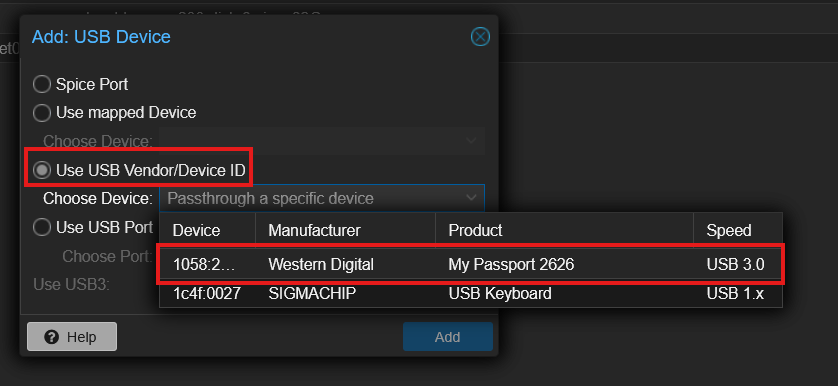
Double-check the dropdown shows your USB drive's vendor and model. Keyboards, mice, hardware tokens, and any other USB device on the host show up in the same list — picking the wrong one passes through the wrong hardware to PBS.
TIP
Why USB passthrough instead of SCSI passthrough? Some older PBS tutorials use qm set 200 -scsi2 /dev/disk/by-id/... from the Proxmox host CLI. That works mechanically — it passes the underlying block device through as a SCSI disk — but the VM sees it as a SCSI device instead of as the actual USB device, and the VM's USB stack never sees anything. The PVE UI USB passthrough is more accurate (USB device → VM USB stack), easier to set up, and lets the VM's USB subsystem see hot-plug events when you physically plug or unplug the drive — important if you ever want to use the Run on Mount rotation workflow with a thumb drive. The "Use USB Vendor/Device ID" option is also more stable than picking by USB port — it survives moving the drive between physical USB ports on your host.
In the PBS web UI (https://10.1.20.200:8007), navigate to Administration > Storage / Disks. Click the Disks tab.
You'll see a list of all block devices PBS can see. Your USB drive should appear (typically as /dev/sdb) with Usage: unused and GPT: No.
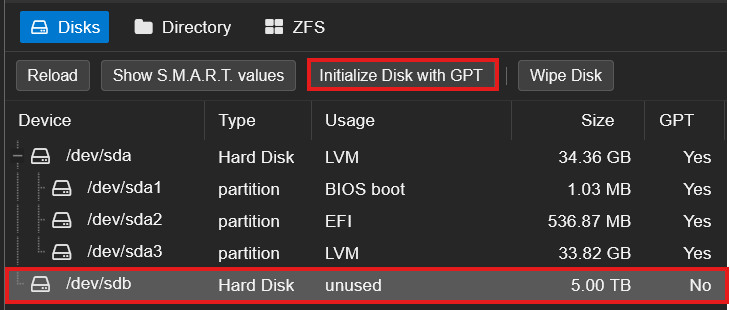
Select the drive row and click Initialize Disk with GPT in the toolbar at the top. Confirm when prompted.
TIP
GPT is required for any drive larger than 2 TB. The older MBR partition table can only address 2 TB of disk space, so if your USB drive is larger you'd lose the rest of the capacity. GPT is also the modern standard and works with every operating system worth using.
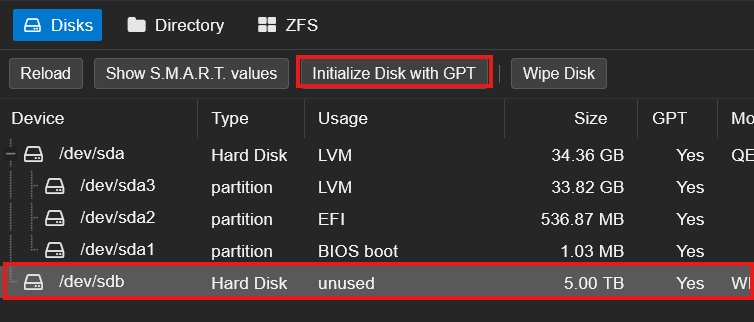
After initialization, the drive's GPT column should flip to Yes. The drive is now ready for the Directory wizard.
Still in Administration > Storage / Disks, click the Directory tab. Click Create: Directory to open the wizard.
Fill in:
/dev/sdb)ext4 (xfs also works, ext4 is the safer default for portable drives)usb-backup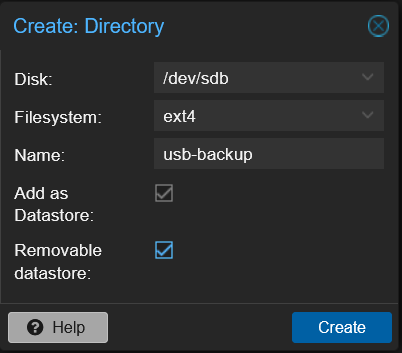
Click Create.
In one operation PBS will:
/mnt/datastore/usb-backup (PBS chooses this path automatically based on the datastore name)/etc/proxmox-backup/datastore.cfg as the datastore's backing-device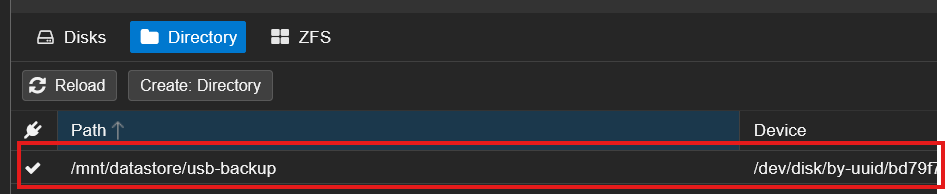
NOTE
PBS does NOT add an entry to /etc/fstab for removable datastores. It manages mounts itself through its own daemon, using the partition UUID. If you ever see fstab entries for a removable datastore, something is wrong — remove them, otherwise PBS and fstab will fight over the mount.
Click on the usb-backup datastore in the left sidebar, then click the Sync Jobs tab. Click Add, and you'll be asked to choose a direction: Pull or Push. Choose Pull.
NOTE
PBS 4.0 added push sync as an option alongside pull. For our case, pick Pull: the sync job lives on the destination (where the data is going), and we're sitting on the usb-backup datastore. The mental model "sync job lives on the destination" applies to every tier in this series, so pull is the consistent choice.
The Add: Sync Job - Pull Direction dialog opens. Configure it:
| Field | Value | Notes |
|---|---|---|
| Local Datastore | usb-backup | Auto-filled — this is where the sync writes |
| Local Namespace | Root | Default — only matters if you use PBS namespaces |
| Local Owner | root@pam | Default |
| Sync Schedule | change to daily | The default is hourly — overkill for a redundancy copy |
| Rate Limit | Unlimited | Set a cap if your USB drive is slow enough that sync saturates the bus |
| Location | Local | Source is on the same PBS, not a remote |
| Source Datastore | backups | The primary datastore |
| Source Namespace | Root | Default |
| Max. Depth | Full | Sync the entire namespace tree |
| Remove Vanished | check it | Without this the USB just accumulates pruned backups forever |
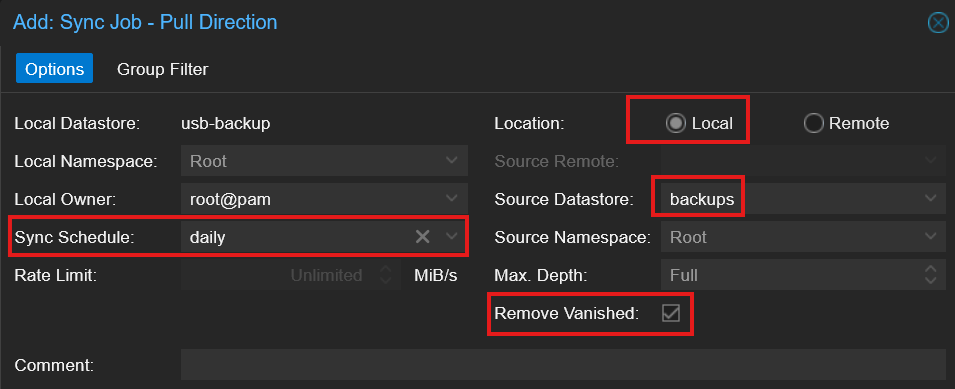
Leave Comment empty unless you want a label for this job.
Click Add.
TIP
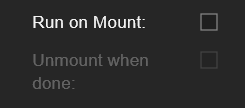
For the USB rotation workflow (plug in → auto sync → unplug), check the Advanced box at the bottom-right of the dialog. You'll get two extra options: Run on Mount (triggers the sync automatically when the drive is mounted) and Unmount when done (PBS unmounts the drive after the sync completes so you can safely unplug). Set Sync Schedule to empty for this workflow — the sync fires on mount instead of on a clock. Unmount when done stays greyed out until you check Run on Mount first.
The sync job appears in the Sync Jobs list. Select it and click Run Now to trigger the first sync manually instead of waiting for the schedule.
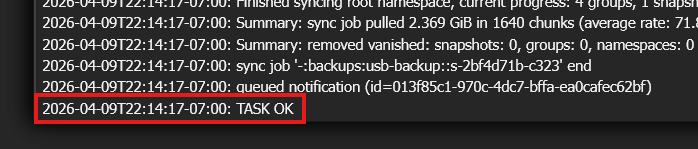
A task window opens at the bottom of the screen — click it to watch the live log. You should see backup snapshots being pulled from the backups datastore to usb-backup. A few GB of typical homelab backups syncs in well under a minute on USB 3.0.
When the task finishes, the log ends with a summary and TASK OK:
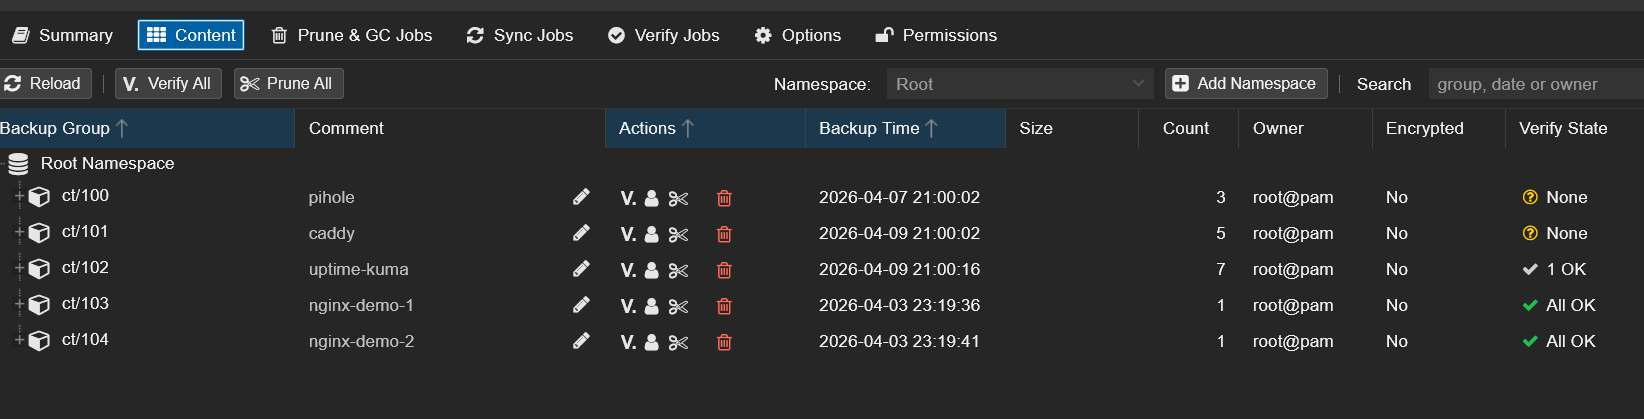
Open the usb-backup datastore > Content tab. You should see the same backup groups as your primary backups datastore — same containers and VMs, same snapshot timestamps.
You now have two copies of your backups on two different physical devices. The next step proves the USB copy can actually rebuild the primary if you ever lose it.
The whole point of having a USB tier is to rebuild the primary backups datastore when something destroys data in it. To prove this works, here's a real disaster recovery drill: I destroyed a live container in PVE, removed its backup group from the primary datastore, then recovered everything from the USB drive — without making a single change on the Proxmox VE side.
You don't need to follow along with this step. This is a demonstration to show the recovery pattern works end-to-end. When you actually need it, you'll follow the same steps with your own data.
WARNING
This drill destroyed the running CT 100 (Pi-hole) and removed its backup group from the primary backups datastore. Everything was fully restored at the end, but don't attempt this on infrastructure your network depends on unless you're comfortable with a few minutes of downtime.
The architectural idea: PVE only ever talks to the primary backups datastore through its existing storage entry. The USB tier doesn't get added to PVE as a parallel restore source. Its job is to feed data BACK into backups after a disaster. Once the primary is rehydrated, PVE restores happen exactly the same way they did in the original Setup Guide — no new credentials, no new storage entries, no PVE-side changes.
PVE  ──(unchanged storage entry)──>  PBS:backups  <──reverse sync──  usb-backup
                                        │
└──── (was destroyed, now rebuilt) ────First, I confirmed CT 100 (Pi-hole) was running and serving DNS. Then I destroyed it in PVE.
After the destroy, CT 100 is gone from the PVE sidebar. DNS stopped resolving immediately.
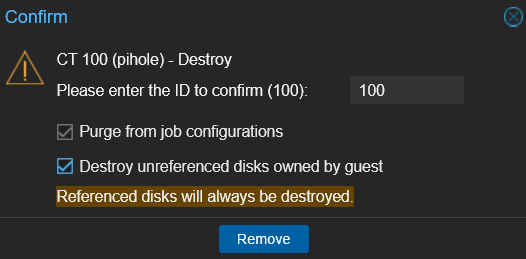
Next, I simulated the primary datastore losing CT 100's data. In the PBS web UI on the backups datastore > Content tab, I right-clicked the ct/100 group and clicked Remove.
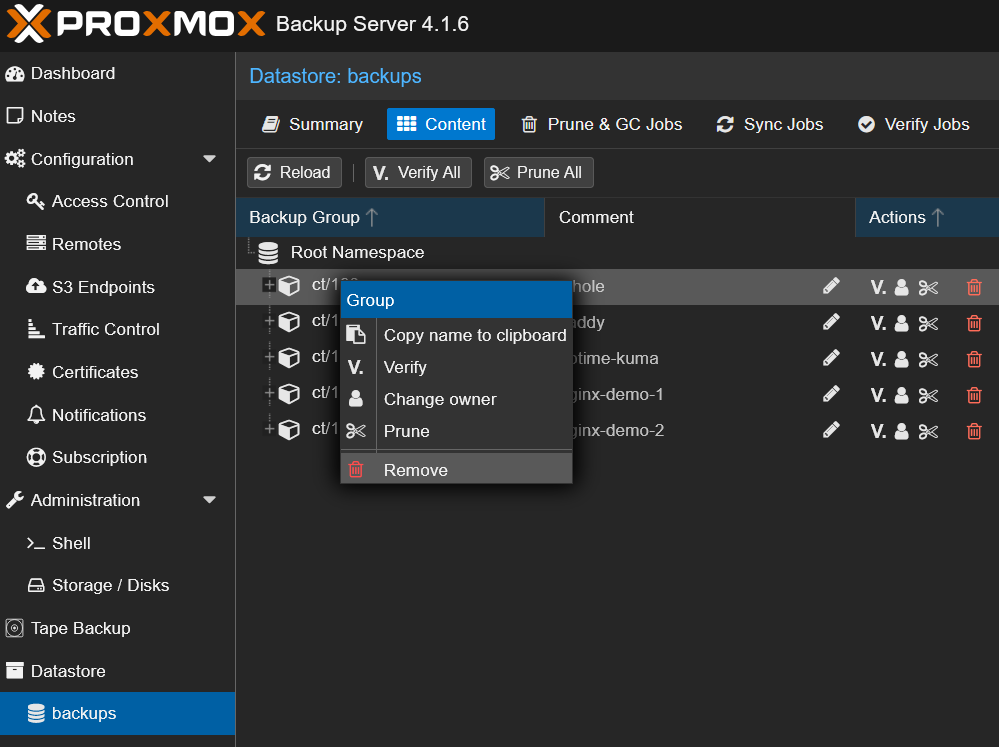
The ct/100 group disappeared from backups. CT 100 is now gone from both PVE and the primary backup datastore — the only place its backup data still exists is on the USB drive.
NOTE
The PBS UI labels this action Remove. The underlying CLI verb is forget (proxmox-backup-client group forget ct/100) — same operation, the UI just uses a friendlier label. Either way, this removes the snapshot index entries but doesn't immediately delete the chunks on disk. The chunks stay until the next garbage collection run, which means PBS deduplication can still benefit from them later.
TIP
For a more dramatic "the entire primary datastore was lost" scenario, you'd repeat the Remove step on every backup group in backups (one click per group). The reverse sync pulls everything back. The single-group version shown here is faster and tells a focused story — "we lost CT 100 in two ways and recovered it from the USB tier."
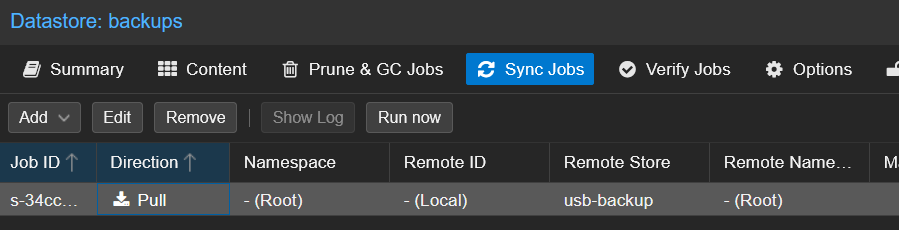
This is the core recovery move. I created a sync job that copies data FROM usb-backup INTO backups — the reverse direction of the daily sync from Step 5.
On the backups datastore, I went to Sync Jobs > Add > Pull, set the Source Datastore to usb-backup, left the schedule blank (one-shot recovery), and added a Group Filter scoped to ct/100 so the sync only pulled back what was missing.
After clicking Run now, the recovery completed in seconds:

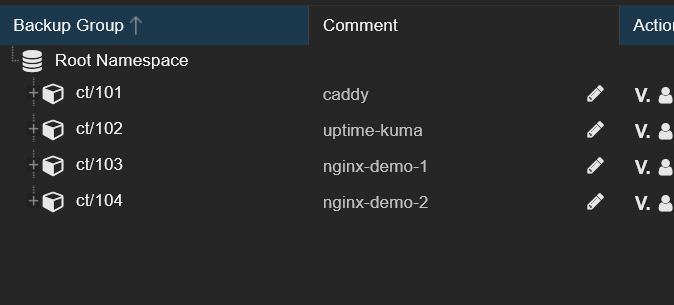
Back on the backups > Content tab, ct/100 is back with all its original snapshots:

The final step: restore the container. In PVE, I clicked on the pbs storage in the sidebar — the same storage entry from the original PBS Setup Guide. No new credentials, no new storage entries, no PVE-side configuration was touched at any point.
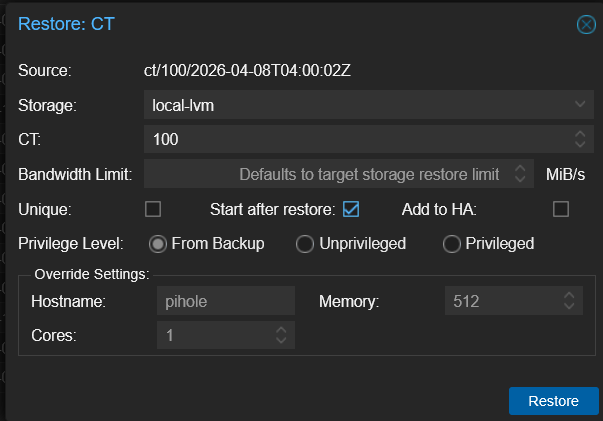
The backup snapshots PBS just recovered from the USB tier appeared immediately:

I selected the most recent CT 100 snapshot and clicked Restore, with Start after restore checked so the container comes back online automatically:
After the restore finished, CT 100 came back up and DNS started resolving again — Pi-hole was back at the same IP, with the same config it had before I destroyed it.
I then deleted the reverse sync job from the backups Sync Jobs tab since it was a one-shot for this drill. The original backups → usb-backup sync job from Step 5 (on the usb-backup datastore) stays — that's the daily sync that protects future backups.
Two simultaneous disasters, recovered with zero PVE-side configuration changes:
| Disaster | Recovery |
|---|---|
| Pi-hole container destroyed in PVE | Restored from PBS via the existing PVE storage entry |
CT 100's backup group removed from primary backups | Rehydrated from the USB tier via reverse sync |
This is the actual purpose of the USB tier: not to be a parallel restore source for PVE, but to rebuild missing data in the primary datastore when something destroys it. Once backups is hydrated again, everything downstream — PVE backups, PVE restores, the daily Step 5 sync — keeps working as if nothing happened.
The same pattern scales up to bigger disasters. If your entire backups datastore got corrupted (not just one group), you'd Remove every group in the Content tab and reverse-sync everything back. If the PBS VM itself died, you'd reinstall fresh PBS, recreate the empty backups datastore, re-attach the USB drive (PBS recognizes the existing partition UUID and re-registers it as a removable datastore via the Directory wizard), and reverse-sync. PVE picks up where it left off in every case.
Two possibilities. If PBS is in a VM, you forgot to pass the drive through via the PVE UI in Step 2 — go to VM 200 > Hardware > Add > USB Device and add it. If PBS is on bare metal, check that the drive isn't already mounted by the host's automounter — lsblk should show it as unused with no MOUNTPOINT.
The drive isn't physically visible to the Proxmox host. Check lsblk -o NAME,SIZE,TYPE,MOUNTPOINT,MODEL on the host — if it doesn't show up there, the host's USB controller isn't seeing it. Try a different USB port (USB 3.0 ports are blue, USB 2.0 ports are black). If it shows up in lsblk but not in the PVE Add USB Device dropdown, refresh the dialog.
PBS does NOT use /etc/fstab for removable datastores. If you added an fstab entry from an old tutorial, remove it — PBS and fstab will fight over the mount and PBS may refuse to start. PBS handles the mount lifecycle itself via the partition UUID stored in the datastore config.
In a PBS VM with SCSI passthrough, the mount-event detection is less reliable than bare metal. The drive still mounts on VM boot (PBS notices the device and mounts it), but between boots you may need to manually click the Mount button on the datastore Summary page to trigger the sync. On bare-metal PBS with udev, run-on-mount is fully automatic.
Check the sync job's Source Datastore in the dialog — it should be usb-backup, not backups. If you accidentally set it to backups, the job is syncing from a datastore into itself and silently doing nothing. Edit the job and fix the source.
Also confirm the sync direction in the dialog title: it should say Add: Sync Job - Pull Direction. Pull means "destination pulls from source," and you want backups (where you're sitting) to pull from usb-backup.
You now have:
backups datastore to the USBYour data now survives accidental deletion, disk failure on the primary host's NVMe, bad upgrades, and ransomware that wipes the local datastore. But the USB drive is still in the same room as the primary — if the building floods or the rack burns, both go down together.
Part 2 of this series adds PBS-to-PBS pull sync — a second PBS instance on separate hardware (or in your homelab on a second host) that pulls backups from the primary. This protects against the entire primary host failing, not just its disks. Same pull-sync pattern you used in Step 5, just pointed at a remote PBS instead of a local datastore. The recovery drill works the same way: reverse-sync the secondary back into the primary's backups datastore, then restore via PVE without any PVE-side changes.
Part 3 of this series adds Cloudflare R2 as an offsite cloud tier via the PBS S3 backend (PBS 4.0 tech preview). This is the "1" in 3-2-1 — the offsite copy that survives even if your entire physical location is destroyed. Free for under 10 GB. The recovery drill is even more dramatic in Part 3 because you'll watch chunks pull from R2 over the internet and reassemble the primary datastore in real time — and you'll see the actual Class A/B operation counts in the Cloudflare dashboard prove it cost effectively $0.
Some links are affiliate links. I may earn a small commission at no extra cost to you.