.png)
OpenClaw on AMD Strix Halo: Set Up a Self-Hosted AI Agent with 128GB Unified Memory
March 26, 2026Tutorial
⚠This site is under active development. Some features may not work as expected, and new content is being added regularly.
.png)
You've spent four tutorials building an AI monitoring pipeline — agent personality, SSH security, diagnostic scripts, Matrix integration, model tuning. If the SSD dies tomorrow, how much of that can you get back?
This tutorial answers that question. OpenClaw has a built-in backup command that captures your agent's entire state. We'll create a backup, verify it, wipe everything, and restore from scratch — proving it actually works.
NOTE
This is Part 5 of a 6-part series. Parts 1-4 built the pipeline. This part protects it. Part 6 adds HTTPS and production hardening.
The built-in openclaw backup create captures the entire ~/.openclaw/ directory tree:
~/.openclaw/
├── openclaw.json          config (model, gateway, channels, hooks)
├── .env                   secrets and API keys
├── exec-approvals.json    tool permissions
├── workspace/             personality (IDENTITY.md, USER.md), memory, scripts
├── credentials/           Matrix tokens, OAuth
├── agents/                session history
├── plugins/               installed plugins
├── cron/                  scheduled tasks (morning brief, etc.)
├── canvas/                dashboard data
└── (memory, subagents, devices, identity, logs)
The archive also includes a manifest.json that records the resolved source paths and archive layout — useful for understanding what went where during restore.
These are system-level files that live outside ~/.openclaw/:
| File | Purpose | How to recreate |
|---|---|---|
~/.ssh/id_ed25519_proxmox_monitor | SSH key for Proxmox access | Part 2, Step 1 |
~/.ssh/config | Proxmox SSH alias | Part 2, Step 8 |
| Systemd service file | OpenClaw auto-start | Part 1, service setup |
| Ollama service override | GPU memory config | Part 1, Ollama config |
/etc/profile.d/rocm-strix-halo.sh | ROCm environment variables | Part 1, ROCm setup |
/etc/modprobe.d/ttm.conf | GPU unified memory | Part 1, TTM setup |
| Proxmox diagnostic scripts | Dispatcher + per-service scripts | Part 2, Steps 3-7 |
These are all documented in earlier parts of the series. If you need to rebuild from scratch, follow the relevant steps from Parts 1-2. The SSH key on the Proxmox side (authorized_keys) survives independently — you just need to regenerate the private key and update it.
TIP
If you want belt-and-suspenders, manually copy ~/.ssh/id_ed25519_proxmox_monitor and ~/.ssh/config alongside your backup archive. Two extra files that save you a re-keying exercise.
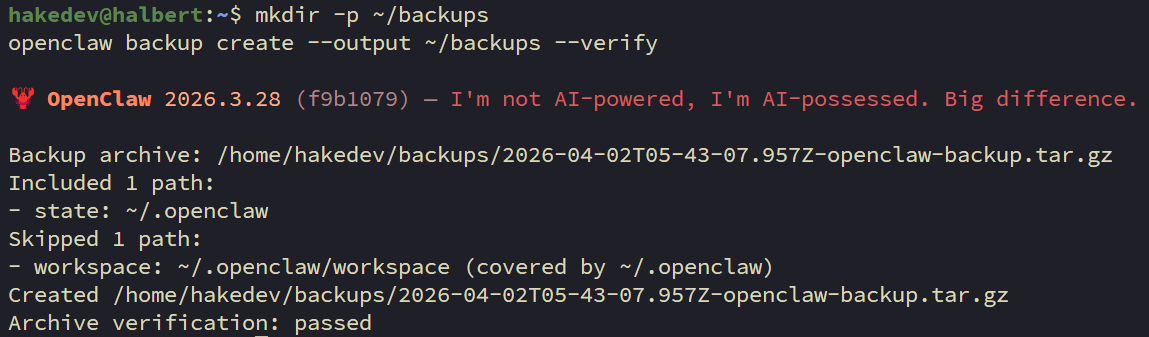
mkdir -p ~/backupsopenclaw backup create --output ~/backups --verifyThe --verify flag validates the archive immediately after creation. You'll get a timestamped .tar.gz in ~/backups/.
ls -lh ~/backups/
See what's inside the archive:
tar -tzf ~/backups/*openclaw-backup*.tar.gz | head -20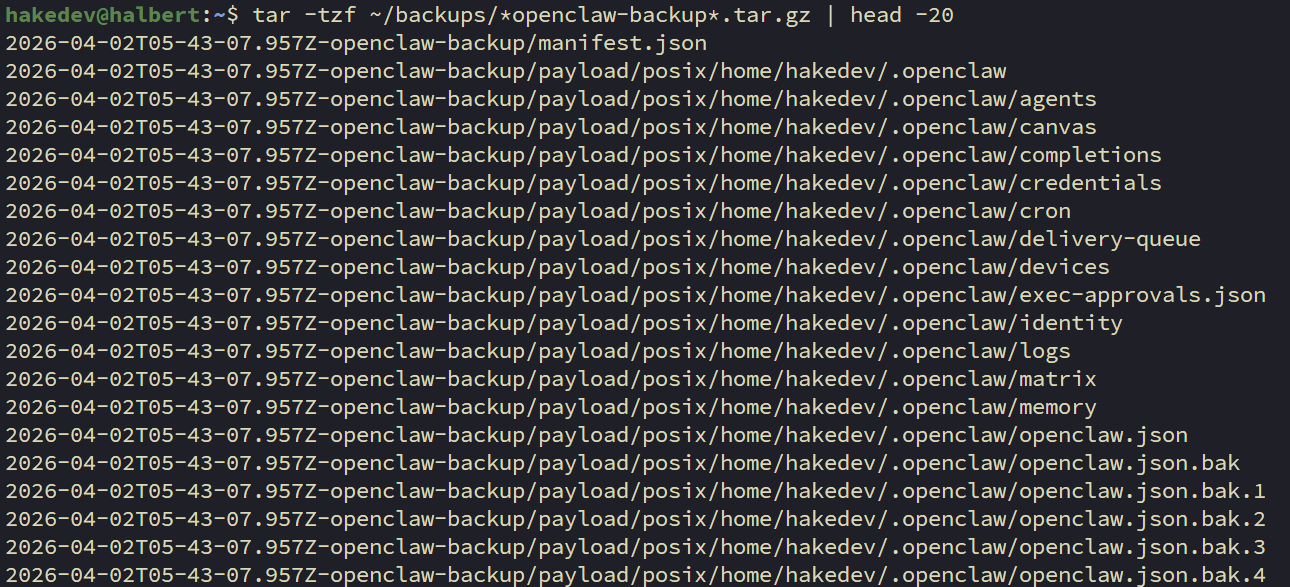
Note the path structure — the archive uses nested directories like <timestamp>-openclaw-backup/payload/posix/home/username/.openclaw/.... This matters during restore.
You can verify any archive at any time:
openclaw backup verify ~/backups/*openclaw-backup*.tar.gz
The backup is useless if it dies with the machine:
scp ~/backups/*openclaw-backup*.tar.gz user@your-nas:/path/to/backups/WARNING
The archive contains SSH credentials, API tokens, and Matrix access tokens. Encrypt it before storing on shared media: gpg -c backup.tar.gz. Store the passphrase somewhere safe — not in the backup.
TIP
Follow 3-2-1: three copies, two different media, one offsite. At minimum, get the archive off the machine.
A backup you haven't tested is a backup you don't have.
Before destroying anything, snapshot what "working" looks like:
echo "OpenClaw version: $(openclaw --version 2>&1)"echo "Workspace files:" && ls ~/.openclaw/workspace/openclaw cron listssh proxmox diagnostics-index 2>&1 | head -3
Save this output — it's what you're restoring to.
WARNING
This is intentionally destructive. Make sure Step 5 (off-machine copy) is done first.
Stop the gateway:
systemctl --user stop openclaw-gatewayDelete the entire OpenClaw state:
rm -rf ~/.openclawVerify it's gone:
ls ~/.openclaw/ 2>&1 || echo "State wiped"Everything is gone. Config, personality, memory, credentials, cron jobs — all deleted.
WARNING
There is no openclaw backup restore command. Despite having backup create and backup verify, there's no restore subcommand. Restoration is manual extraction.
Extract the backup archive to a staging directory:
mkdir -p /tmp/openclaw-restoretar -xzf ~/backups/*openclaw-backup*.tar.gz -C /tmp/openclaw-restoreCheck the manifest to understand the layout:
cat /tmp/openclaw-restore/*/manifest.json | python3 -m json.toolCopy the payload to your home directory. The archive mirrors the original absolute path under payload/posix/:
ARCHIVE_DIR=$(ls -d /tmp/openclaw-restore/*openclaw-backup*)
cp -a "$ARCHIVE_DIR/payload/posix/home/"*"/.openclaw" ~/
NOTE
The path inside the archive mirrors the original absolute path. The payload/posix/ prefix is OpenClaw's archive convention. Adjust the cp command if your username or home directory differs from the original.
Start the gateway:
systemctl --user start openclaw-gatewayWait a few seconds for it to initialize:
sleep 5Run the same checks from Step 6:
echo "OpenClaw version: $(openclaw --version 2>&1)"echo "Workspace files:" && ls ~/.openclaw/workspace/openclaw cron listCompare to Step 6. Config, workspace files, cron jobs, and credentials should all be back.
The ultimate proof. Stop nginx and let the full pipeline run:
pct exec 150 -- systemctl stop nginxIf the investigation report lands in your Matrix Investigations room, the restore is complete. Everything works — config, credentials, Matrix tokens, webhook handling, SSH access, diagnostic scripts.
TIP
Uptime Kuma fires webhooks on state change only (UP to DOWN). If the service was already down during the restore, bring it UP first, wait for Kuma to register it, then DOWN again to trigger a fresh webhook.
After verifying:
pct exec 150 -- systemctl start nginxClean up the staging directory:
rm -rf /tmp/openclaw-restoreConfig only — skip workspace, credentials, and everything else. Just the config file:
openclaw backup create --only-config --output ~/backupsGood for quick snapshots before changing settings.
Skip workspace — if your workspace has large files and you only need config + credentials:
openclaw backup create --no-include-workspace --output ~/backupsDry run — see what would be backed up without creating the archive:
openclaw backup create --dry-runAlways back up first:
openclaw backup create --output ~/backups --verifyThen update and run the post-update migration:
openclaw updateopenclaw doctorsystemctl --user restart openclaw-gatewayWARNING
Always back up before updating. Run openclaw doctor after every update — it handles config schema migrations. If the gateway won't start after an update, doctor is usually the fix.
Generate a new key:
ssh-keygen -t ed25519 -C "openclaw-agent -- rotated" \
  -f ~/.ssh/id_ed25519_proxmox_monitor -N ""
Update the authorized_keys entry on Proxmox with the new public key (keep the restrict,command=,from= prefix from Part 2). Then test:
ssh proxmox diagnostics-indexAfter the Part 4 shootout, remove unused models to free disk:
ollama rm qwen3.5:9bollama rm gpt-oss:20bollama rm qwen3.5:27b-q8_0ollama rm qwen3.5:122b-a10bKeep whatever you're running in production. Models aren't in the backup (they're 173GB+) — faster to ollama pull than to back up and restore.
OpenClaw's built-in backup captures the full agent state — config, credentials, workspace, cron jobs, session history, exec approvals. One command to create, one command to verify. Restoration is manual cp from the extracted archive since there's no restore subcommand yet.
What it doesn't cover: SSH keys, systemd services, and GPU config. These are system-level files documented in Parts 1-2. If you're starting from a dead machine, follow Parts 1-2 for the system setup, then restore the OpenClaw backup on top.
The key takeaway: back up before every update, copy the archive off-machine, and test the restore at least once. A backup you haven't tested is a backup you don't have.
In Part 6, we add Caddy and Pi-hole for HTTPS — fixing the Element Web service worker warnings and making the whole setup production-ready.
.png)
.png)
.png)
Some links are affiliate links. I may earn a small commission at no extra cost to you.