.png)
OpenClaw Part 2: AI-Powered Incident Response with Uptime Kuma
March 28, 2026Tutorial
⚠This site is under active development. Some features may not work as expected, and new content is being added regularly.
.png)
OpenClaw has been getting a lot of attention lately — it's one of the most popular open-source AI agent projects right now, and I wanted to see what it could actually do. Not just chat, but execute real tasks: run commands, manage files, interact with services. The kind of thing you'd want an AI to do in a homelab.
So I set it up on a GMKtec EVO X2 with AMD's Ryzen AI Max+ 395 and 128GB of unified memory. This hardware is interesting because the CPU and GPU share the same memory pool — no discrete GPU needed, and you can run models that wouldn't fit on most consumer graphics cards.
Everything here is 100% CLI-based and fully self-hosted. No cloud accounts, no API keys, no data leaving your network. By the end, you'll have an AI agent running on your own hardware that you can chat with from a browser.
NOTE
This is Part 1 of a 6-part series. We start with the agent itself, then build up to automated monitoring with Uptime Kuma (Part 2), a self-hosted Matrix command center (Part 3), a local model shootout comparing 6 models (Part 4), backup and restore (Part 5), and production hardening (Part 6).
TIP
Ubuntu Server (not Desktop) is the right choice here. No desktop environment needed — everything is CLI-based, and you'll save resources for AI inference.
Before changing anything, update the system and check what we're working with. SSH into your machine:
sudo apt update && sudo apt upgrade -yNow check the baseline:
uname -rlspci | grep -i displayfree -h | head -2You should see something like this:
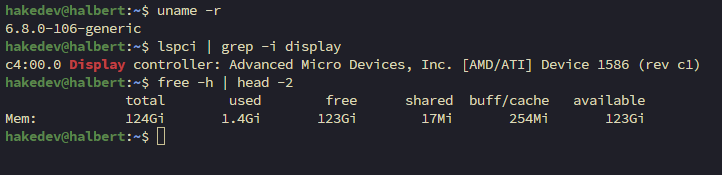
Notice the GPU shows as "Device 1586" — the stock Ubuntu 24.04 kernel (6.8.0) doesn't have the Strix Halo device IDs yet. That changes after we upgrade the kernel and install ROCm. The 124GB of 128GB is expected — firmware and the iGPU reserve a small amount.
NOTE
Your IP address, hostname, and username will differ from this tutorial. Wherever you see specific IPs or usernames, substitute your own values.
AMD's ROCm documentation requires kernel 6.18.4+ for stable Strix Halo support. The KFD driver fixes for queue creation and memory availability landed in 6.18.4. Without this, GPU compute workloads may fail or behave unpredictably.
NOTE
Why not the Ubuntu HWE or OEM kernel? We evaluated three options:
linux-generic-hwe-24.04) ships kernel 6.17 — close, but missing critical 6.18.4 Strix Halo fixes.linux-oem-24.04c) tops out at 6.14 — too old.Mainline 6.18 is the only option that meets AMD's requirements.
WARNING
If secure boot is enabled in your BIOS, mainline kernels won't boot. Disable secure boot first. If something goes wrong, your old kernel remains installed — select it from GRUB Advanced Options to roll back.
TIP
The exact filenames below may change with point releases. Check kernel.ubuntu.com/mainline for the latest 6.18.x version before downloading.
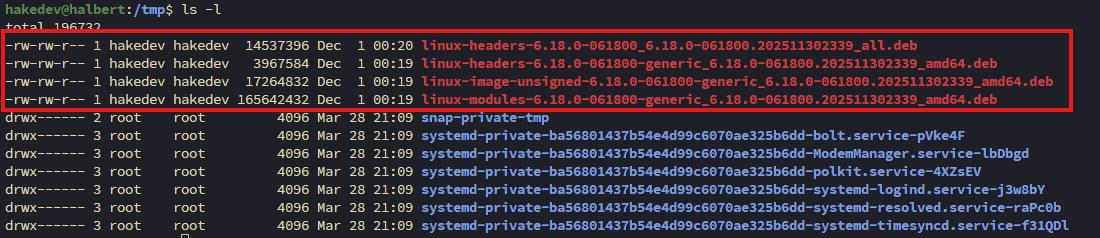
cd /tmpwget -q https://kernel.ubuntu.com/mainline/v6.18/amd64/linux-headers-6.18.0-061800-generic_6.18.0-061800.202511302339_amd64.debwget -q https://kernel.ubuntu.com/mainline/v6.18/amd64/linux-headers-6.18.0-061800_6.18.0-061800.202511302339_all.debwget -q https://kernel.ubuntu.com/mainline/v6.18/amd64/linux-image-unsigned-6.18.0-061800-generic_6.18.0-061800.202511302339_amd64.debwget -q https://kernel.ubuntu.com/mainline/v6.18/amd64/linux-modules-6.18.0-061800-generic_6.18.0-061800.202511302339_amd64.debYou should see four .deb files in /tmp:
Install all four:
sudo apt install -y ./linux*6.18*.debsudo rebootAfter reconnecting (about 60 seconds):
uname -r
The GPU will still show as "Device 1586" — that's fine. It gets its proper name after ROCm.
ROCm is AMD's equivalent of NVIDIA's CUDA. Without it, all AI inference runs on CPU — which works, but it's painfully slow compared to GPU acceleration.
NOTE
ROCm install flags for Strix Halo: AMD recommends --usecase=rocm for the full compute stack and --no-dkms because Ryzen APUs should use inbox kernel drivers, not compiled DKMS modules. If you're on an Instinct datacenter GPU, you'd want DKMS — but for consumer hardware like Strix Halo, skip it.
TIP
The exact URL below may change. Check AMD's ROCm install docs for the current version.
wget -q https://repo.radeon.com/amdgpu-install/7.2/ubuntu/noble/amdgpu-install_7.2.70200-1_all.debsudo apt install -y ./amdgpu-install_7.2.70200-1_all.debThis next command downloads 2-3GB of packages and takes several minutes:
sudo amdgpu-install -y --usecase=rocm --no-dkmsAdd your user to the GPU access groups:
sudo usermod -aG render,video $USERThe group changes require a reboot to take effect — we'll reboot after the next two steps.
This is where Strix Halo gets interesting. By default, the GPU can only map about 15.5GB of system memory. But with 128GB of unified memory sitting right there, that's a waste. The Translation Table Manager (TTM) controls how much memory the GPU can access.
NOTE
AMD recommends keeping BIOS dedicated VRAM small (0.5GB) and using the shared TTM pool instead. We're setting 100GB for GPU access, leaving about 28GB for the OS and applications. Adjust based on your needs.
sudo apt install -y pipxpipx install amd-debug-toolssudo $HOME/.local/bin/amd-ttm --set 100You should see: "Successfully set TTM pages limit to 26214400 pages (100.00 GB)". The tool asks about rebooting — say no, we have one more step.
Verify the config was written:
cat /etc/modprobe.d/ttm.confTIP
For Strix Halo, the parameter is ttm.pages_limit — NOT amdttm.pages_limit (that's for Instinct datacenter GPUs). The amd-ttm tool handles this correctly.
These two environment variables are the most important configuration in this entire tutorial. Without them, everything appears to work — but it doesn't work right.
sudo nano /etc/profile.d/rocm-strix-halo.shPaste the following, then save (Ctrl+X, Y, Enter):
# Strix Halo (gfx1151) ROCm configuration
export HSA_OVERRIDE_GFX_VERSION=11.5.1
export HSA_ENABLE_SDMA=0
Make it executable:
sudo chmod +x /etc/profile.d/rocm-strix-halo.shWARNING
HSA_OVERRIDE_GFX_VERSION=11.5.1 is the single most critical setting. Without it, ROCm doesn't recognize gfx1151 and silently falls back to CPU. No error message — your model runs, it responds, everything looks fine, but it's 10x slower than it should be and there's no indication anything is wrong. This one env var fixes it.
WARNING
HSA_ENABLE_SDMA=0 disables a bugged DMA engine in Strix Halo's unified memory path. Without it, compute output corrupts after 4-5 conversational turns — the model starts outputting repetitive single characters. If your AI starts speaking gibberish after a few conversations, this is why.
Both the TTM config and group membership changes require a reboot.
sudo rebootAfter reconnecting, source the env vars and check the GPU:
source /etc/profile.d/rocm-strix-halo.shrocminfo | grep -E "Name:|Marketing"You should see gfx1151 and the GPU recognized:

Compare this to Step 1 where the GPU was "Device 1586". Now it's properly recognized with full memory access.
TIP
If rocminfo only shows CPU, check echo $HSA_OVERRIDE_GFX_VERSION — if it's empty, the profile script didn't source. Verify /etc/profile.d/rocm-strix-halo.sh exists.
Ollama is the local LLM runtime that handles model downloading, GPU loading, and inference. It's what actually runs the AI models — OpenClaw connects to it as a backend.
NOTE
Why Ollama and not SGLang, vLLM, or llama-server? OpenClaw has a dedicated Ollama provider that uses Ollama's native API (/api/chat) for tool calling. The widely reported "Ollama breaks tool calling" bug is actually in OpenClaw's OpenAI compatibility layer (/v1), not in Ollama itself. With the native provider, tool calling works.
curl -fsSL https://ollama.com/install.sh -o /tmp/ollama-install.shsudo sh /tmp/ollama-install.sh
Ollama auto-detects AMD hardware and downloads the ROCm build — no manual configuration needed.
The environment variables from Step 6 only apply to interactive shells. Systemd services need their own env configuration. We also bind Ollama to all interfaces so other devices on the network can access it.
sudo mkdir -p /etc/systemd/system/ollama.service.dsudo nano /etc/systemd/system/ollama.service.d/override.confPaste the following, then save:
[Service]
Environment="HSA_OVERRIDE_GFX_VERSION=11.5.1"
Environment="HSA_ENABLE_SDMA=0"
Environment="OLLAMA_HOST=0.0.0.0"sudo systemctl daemon-reloadsudo systemctl restart ollamaCheck the logs to verify the GPU is detected:
sudo journalctl -u ollama --no-pager -n 10
101GB of VRAM detected — that's the TTM config working. The 262K default context window is massive, enabled by the large memory pool.
OpenClaw is a Node.js application. Install Node.js 22 LTS from NodeSource:
curl -fsSL https://deb.nodesource.com/setup_22.x -o /tmp/nodesource.shsudo bash /tmp/nodesource.shsudo apt install -y nodejsInstall OpenClaw:
sudo npm install -g openclaw@latestVerify both:
node --versionopenclaw --version
OpenClaw has an interactive onboarding wizard that configures the LLM backend, downloads a model, and sets up the gateway service.
openclaw onboardThe first screen is a security warning — read it and accept:
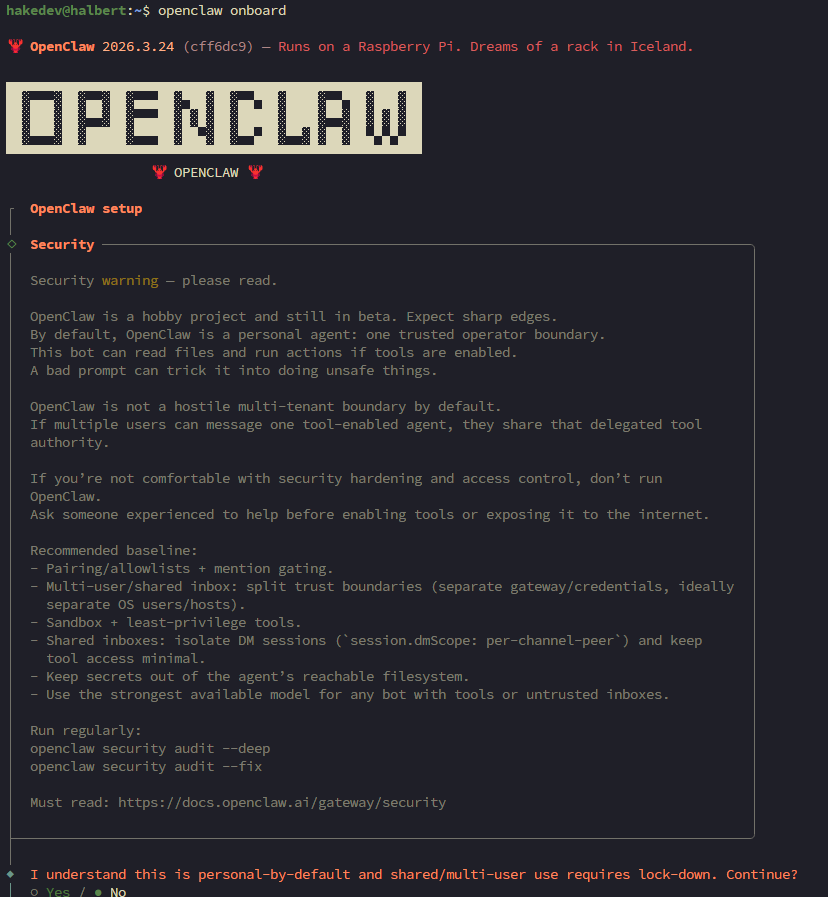
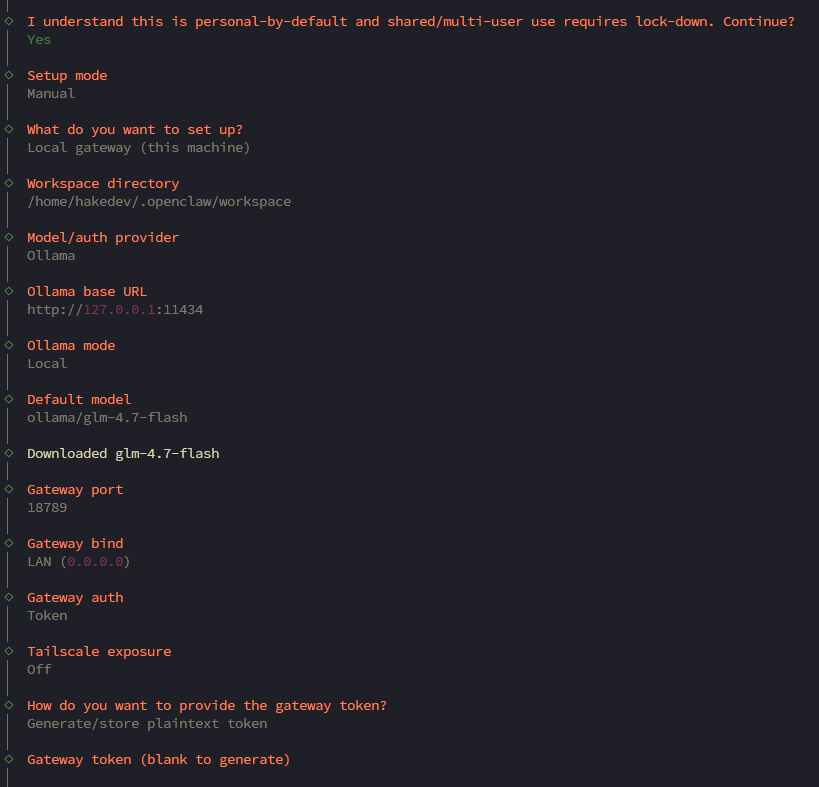
Walk through each prompt with these choices:
~/.openclaw/workspace)http://127.0.0.1:11434)ollama/glm-4.7-flash (the recommended default)The onboarding downloads GLM-4.7-flash via Ollama and creates the gateway service:
NOTE
GLM-4.7-flash is a 30B MoE (Mixture of Experts) model with only 3B parameters active per token. That's why it's fast — 30 billion parameters of knowledge, but only 3 billion fire for each response.
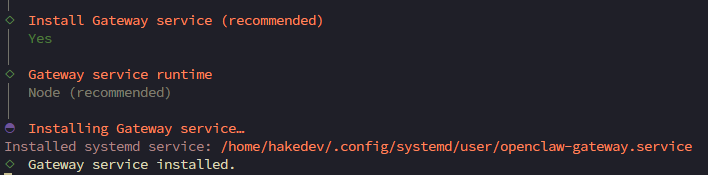
The onboarding installs a user-level systemd service (openclaw-gateway.service) with lingering enabled — this means it survives logouts on headless servers. No custom system service needed.
Verify it's running:
systemctl --user status openclaw-gatewayNOTE
The dashboard URL with token is shown during onboarding. You can get it again anytime with openclaw dashboard --no-open.
OpenClaw's workspace has several personality files that change how the agent interacts with you. Without customization, the agent doesn't know who it is or who you are.
ls ~/.openclaw/workspace/The key files:
Edit the identity file:
nano ~/.openclaw/workspace/IDENTITY.mdHere's an example — make it your own:
# IDENTITY.md - Who Am I?

- **Name:** PinchWorth
- **Creature:** AI butler with a lobster problem
- **Vibe:** Dry wit, competent, gets things done without drama
Now tell the agent about yourself:
nano ~/.openclaw/workspace/USER.md# USER.md - About Your Human
- **Name:** Alex
- **What to call them:** Alex
- **Timezone:** America/New_York
- **Notes:** Runs a homelab with Proxmox, several self-hosted services. Prefers concise answers.
## Context
Homelab enthusiast. Runs Proxmox with ZFS storage, Caddy for reverse proxy, Pi-hole for DNS. This machine is a dedicated AI workstation. Interested in automation and monitoring.Save both files, then restart OpenClaw:
systemctl --user restart openclaw-gatewayTIP
The more context you put in USER.md (timezone, projects, preferences), the more useful the agent becomes. It uses this to tailor responses to your specific situation.
OpenClaw has a built-in Control UI with a chat interface. No Discord or cloud service needed — it runs entirely on your hardware.
The Control UI requires a secure context (HTTPS or localhost). Since the gateway is on a remote machine, we use an SSH tunnel to make it appear as localhost in your browser.
From your workstation (not the server), open a tunnel:
ssh -N -L 18789:127.0.0.1:18789 your_user@your_server_ipNOTE
Replace your_user@your_server_ip with your actual username and IP. The -N flag means "don't open a shell, just tunnel." Leave this running while you use the dashboard. This works the same on Windows (PowerShell), macOS, and Linux.
Get the tokenized dashboard URL (on the server):
openclaw dashboard --no-openCopy the full URL (including the #token=... part) and open it in your browser.
WARNING
The token in the URL authenticates your session — treat it like a password.
Navigate to the Chat section in the Control UI. The first message takes about 30 seconds — that's Ollama loading the model from disk into GPU memory. After that, responses are 2-5 seconds.
Try a real task:
What are my system specs?
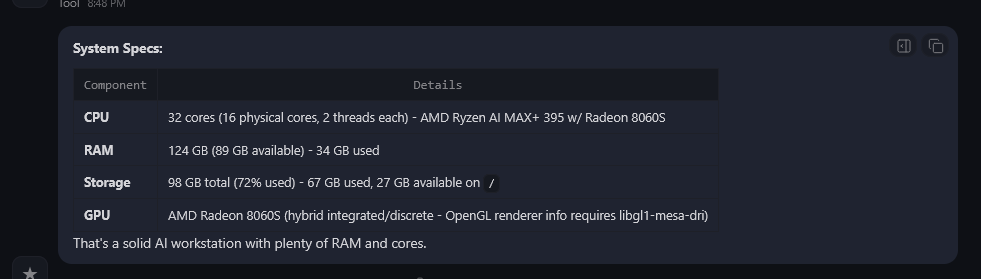
The agent correctly identifies the hardware — AMD Ryzen AI Max+ 395, 124GB RAM, storage, and the Radeon 8060S. All from running commands on the machine. Tool calling confirmed working through Ollama's native API.
Give the agent a taste of what's coming in Part 2. If you have services running on your network:
Check if these services are responding: https://pihole.hake.rodeo, https://vault.hake.rodeo, https://jellyfin.hake.rodeo
NOTE
Replace those URLs with services on your own network. The agent can check anything reachable from the machine.
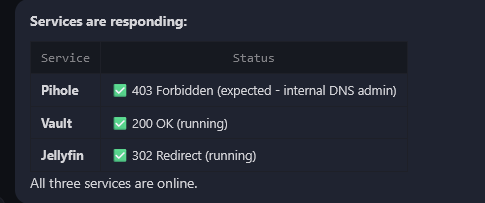
Pi-hole returned 403 — the agent knows that's expected because the admin UI needs authentication. Jellyfin returned 302 — it recognized that as a login redirect. Vault returned 200 — running. "All three services are online."
That's the difference between a monitoring tool and an AI agent. Uptime Kuma would tell you "403 — down." The agent knows it's not.
If it doesn't survive a reboot, it's not done.
sudo rebootAfter reconnecting (about 90 seconds — the model needs to reload):
uname -rsystemctl --user status openclaw-gateway --no-pager | head -5You should see kernel 6.18 and the gateway running. Open the WebChat dashboard (re-establish the SSH tunnel first) and send a message — the agent should respond after about 30 seconds (cold model reload).
GPU not detected by ROCm — rocminfo shows only CPU. The HSA_OVERRIDE_GFX_VERSION=11.5.1 env var is not set. Check echo $HSA_OVERRIDE_GFX_VERSION. For Ollama, verify the systemd override at /etc/systemd/system/ollama.service.d/override.conf. This is the number one gotcha — no error, just slow inference.
ROCm only sees 15.5GB of memory — TTM page limit not configured. Run amd-ttm --set 100 and reboot. Verify with cat /etc/modprobe.d/ttm.conf — should show options ttm pages_limit=26214400.
Model output corrupts after several conversations — SDMA bug. Set HSA_ENABLE_SDMA=0 in both /etc/profile.d/rocm-strix-halo.sh and the Ollama service override.
Kernel 6.18 won't boot — Secure boot is blocking the unsigned mainline kernel. Disable secure boot in BIOS, or select the old kernel from GRUB Advanced Options.
OpenClaw shows "thinking" but never responds — Ollama isn't running or HSA env vars are missing from the Ollama service. Check sudo systemctl status ollama and sudo journalctl -u ollama -n 20. It's almost always the backend.
amd-ttm not found — It's in amd-debug-tools, installed via pipx, not pip or apt. The binary lands at ~/.local/bin/amd-ttm.
First message takes 30+ seconds — Normal. Ollama loads the model from disk to GPU on the first request after boot. Subsequent responses are 2-5 seconds.
systemctl --user commands fail — Make sure you're running as your user, not root. User services don't work with sudo.
Here's what we built:
Everything runs locally. No cloud, no API keys, no data leaving your network.
In Part 2, we connect this agent to Uptime Kuma for automated incident response. When a service goes down, Uptime Kuma detects it in seconds and triggers the agent to investigate — running diagnostic scripts on your Proxmox host, analyzing the output, and posting an investigation report. The agent goes from chatbot to monitoring tool.
.png)
.png)
.png)

Some links are affiliate links. I may earn a small commission at no extra cost to you.